
Drawing a map of India is an engaging and educational process that helps you understand the country’s geographical layout. India’s shape resembles a kite, with its diverse borders consisting of curves, sharp angles, and a variety of landscapes. Whether you’re creating a detailed topographical map or a simple outline, the process requires patience and attention to detail. This step-by-step guide will walk you through drawing India’s map, marking key features like states, cities, rivers, and landmarks.
Introduction to Drawing India’s Map
India is the seventh-largest country by land area in the world, and its map is quite distinct due to its irregular shape and complex borderlines. The country is located in South Asia and is known for its diverse geography, ranging from the towering Himalayan mountains in the north to the fertile plains and dense forests in the middle, and the arid desert and coastal regions in the south. Drawing the map of India requires understanding its general shape, including its borders and major features.
Whether you’re working on a geography project, creating a custom artwork, or simply learning about the country’s layout, this guide will provide all the steps you need to successfully draw the map of India with clarity and accuracy. Let’s break down the process into easy-to-follow stages.
Step 1: Drawing the Outline of India
1.1 Start with a Vertical Line


Begin by placing a blank piece of paper on a flat surface. Using a ruler and pencil, draw a vertical line roughly 14.5 cm (5.7 in) long, slightly off-center towards the left side of the page. This will act as the central line for your map. Make sure the line is faint so that you can easily erase it later if needed.
1.2 Add a Horizontal Line

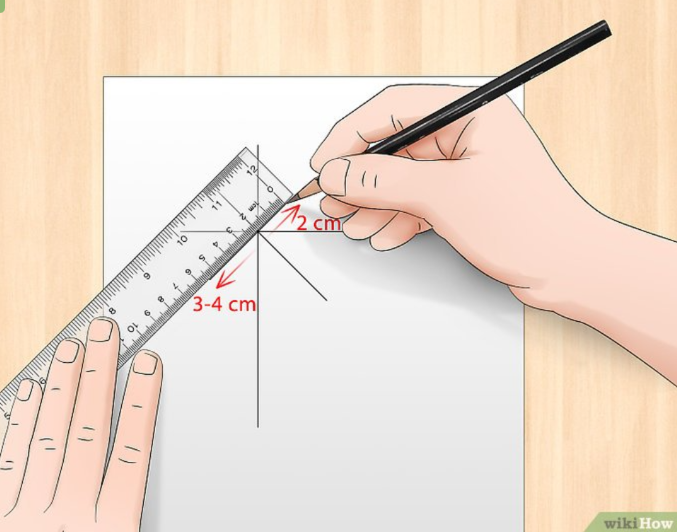
Next, place a small dot 4.5 cm (1.8 in) from the top of the vertical line. This will be your reference point. Using the ruler, draw a horizontal line from the dot, extending 4 cm (1.6 in) to the left and 8 cm (3.1 in) to the right. This should create a cross shape, helping to structure your map.
1.3 Draw Diagonal Lines

For the next step, position your ruler diagonally, from the top-left to the bottom-right. Align it with the intersection of the vertical and horizontal lines, and draw a diagonal line 8 cm (3.1 in) long. Reposition the ruler to create a second diagonal line running in the opposite direction, extending about 3–4 cm (1.2–1.6 in) to the left. The result will be an “X” shape that gives a basic frame for India’s borders.
1.4 Sketch Curved Edges

India’s borders are characterized by numerous curves, so use the X-shaped guidelines as a reference to draw the general outline. Start shaping the bottom portion into a “V” for the southern tip of the country. On the left, make a backward “3”-like curve, and incorporate the distinctive curves for the eastern and western sides as well. The northernmost region should reflect the curves of the Himalayas.
Step 2: Adding States, Cities, and Details
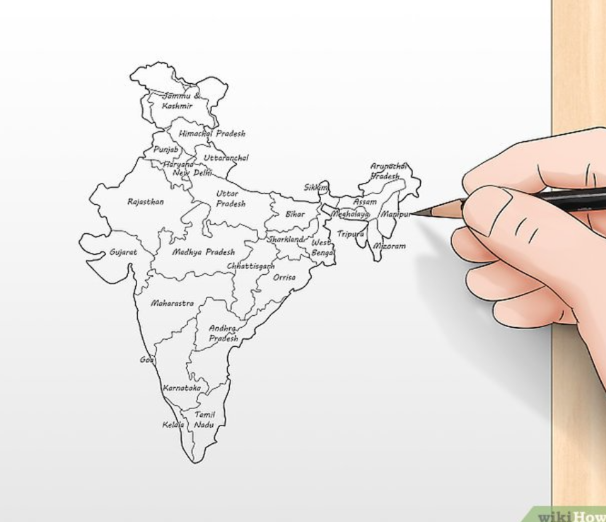
2.1 Draw the States and Union Territories

India is made up of 28 states and 8 union territories, each with distinct shapes. Using a map of India for reference, draw the boundary lines of each state and union territory, which will require some practice due to their intricate and varying shapes. For more precision, use a pencil to lightly mark out the borders before finalizing the lines.
2.2 Mark Major Cities

India’s vast urban landscape includes several prominent cities, such as New Delhi (the capital), Mumbai (on the western coast), Kolkata (in the east), Chennai (in the south), and Bangalore (in the south-central region). Use small dots, stars, or any other symbols to mark their locations on the map. You can also choose to label these cities for clarity.
2.3 Illustrate Topography and Elevation
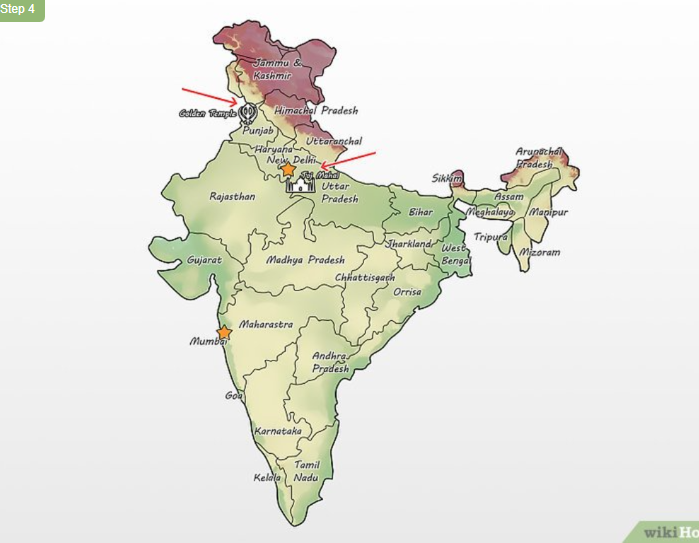
Adding topographical details is an excellent way to represent India’s diverse geography. Use different colors to distinguish various elevations, from the towering Himalayan peaks in the north to the coastal plains in the south. For instance, use dark purple for high-altitude areas like the Himalayas, light yellow for mid-range altitudes, and green for low-lying plains.
2.4 Add Landmarks and Rivers

Include symbols or small drawings of key landmarks, such as the Taj Mahal or the Golden Temple. For rivers, draw squiggly lines to represent bodies of water such as the Ganges, Brahmaputra, or Narmada. Label major oceans surrounding India, like the Arabian Sea, Bay of Bengal, and the Indian Ocean.
2.5 Make a Key for Your Map

A key or legend is essential for any map to be easily understood. Include a box on the side of the map with symbols like dots for cities, squiggly lines for rivers, and icons for landmarks. Label each symbol clearly so that anyone looking at the map can easily interpret the details.
2.6 Add Color for Visual Appeal
Coloring your map will make it more engaging and easier to read. Use different colors for states, rivers, oceans, and landmarks. For example, color each state with a different shade to differentiate them, and use blue for water bodies like rivers and seas.
Step 3: Finalizing and Reviewing Your Map
3.1 Review the Accuracy of Borders
After drawing the outlines and adding details, take a moment to review your map. Check the accuracy of the borders, the placement of cities, and the overall proportions. Ensure that your map accurately represents the shapes of states and rivers.
3.2 Erase Guide Lines
Once you are satisfied with the outline and details of your map, erase any remaining guide lines (the faint vertical, horizontal, and diagonal lines) to leave a clean and neat map of India.
3.3 Optional: Add Decorative Elements
To make your map even more unique, consider adding decorative elements like patterns along the borders, artistic depictions of natural features, or a title at the top of the map.
Frequently Asked Questions(FAQs)
1. How do I get the proportions right when drawing India’s map?
It’s helpful to use a reference map of India for accuracy. You can also practice by measuring sections of the map with your ruler and comparing them to the real dimensions to maintain proportionality.
2. What tools do I need to draw a map of India?
You will need a ruler, a pencil, an eraser, and colored pencils or markers for adding details and coloring the map. A reference map of India will also be useful for accuracy.
3. Can I draw a detailed topographical map of India?
Yes, you can! After drawing the outline of the country, you can add details like mountain ranges, rivers, and cities, and use colors to represent different altitudes and regions of the country.
4. How do I label the states and cities on my map?
Use small dots or stars to mark the locations of major cities, and label them clearly. For states, write the name inside the boundaries or next to the state for easy identification.
5. What’s the best way to color the map?
Coloring your map with different colors for each state, using blue for rivers and oceans, and purple for high-altitude regions like the Himalayas will make it visually appealing and easy to understand.
Conclusion
Drawing a map of India requires both skill and patience, but it is a rewarding exercise that enhances your understanding of the country’s geography. By following the steps outlined above, you can create an accurate and visually appealing map. With practice, you’ll become more familiar with the locations of India’s states, cities, and landmarks, helping you better appreciate its diverse landscapes.