
Setting up remote access to your router can be incredibly useful, especially if you often troubleshoot home network issues for family members, monitor your network for unauthorized access, or need to access files stored on an external hard drive connected to your router. While accessing your router from within your home network is straightforward—typically involving entering the IP address into a browser—configuring it for remote access is slightly more complex. Let’s break down the steps needed to enable remote access securely and efficiently.
Why Access Your Router Remotely?
Remote router access allows you to monitor and control your home network from virtually any location, ensuring you’re always connected and in control. Some key reasons to consider enabling this feature include:
- Troubleshooting and Support: Remotely assist family members by troubleshooting their internet issues.
- Monitoring Usage: Check if your children are online when they should be focusing on other tasks.
- Security: Spot unauthorized devices on your network and disconnect them.
- File Access: Access files from external storage devices connected to your router.
While remote desktop apps like TeamViewer can sometimes achieve similar results, they require a powered-on computer at home. Remote router access, on the other hand, doesn’t rely on additional software or active devices, making it more efficient and versatile for long-term use.
Steps to Access Your Router Remotely
Step 1: Enable Remote Management
To set up remote access, you need to activate the Remote Management (or Remote Access) feature within your router’s settings. Here’s how:
-
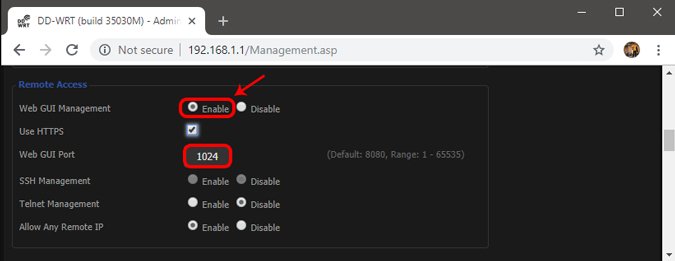
Access the Router’s Web Interface: Open a web browser and type in your router’s local IP address (often 192.168.1.1 or 192.168.0.1). Log in using the router’s username and password.
-
Locate Remote Management Settings: Depending on your router’s brand, this setting might be found under different menus. Below are typical locations for popular router brands:
- Netgear: Settings > Remote Management
- D-Link: Tools > Administration > Enable Remote Management
- Linksys: Administration > Remote Management
- TP-Link: Security > Remote Management
- ASUS: Administration > System > Remote Access Config
-
Change the Default Port Number: For security reasons, change the default port number from 8080 to something unique. Also, ensure your router password is strong and unique to prevent unauthorized access.
Step 2: Set Up Dynamic DNS (DDNS)
Most home internet connections use a dynamic IP address, meaning it changes periodically. DDNS, or Dynamic DNS, allows you to assign a memorable domain name to your network’s IP address, which automatically updates as the IP changes. Here’s how to configure it:
-
Access DDNS Settings in Your Router: Log in to your router’s interface and navigate to the DDNS settings. Look under Administration or WAN settings in most cases.

-
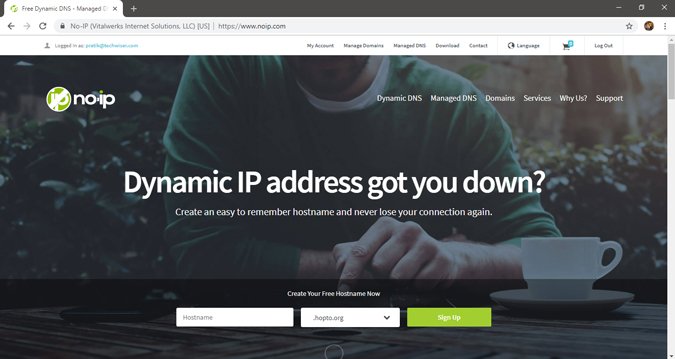
Choose a DDNS Provider: Many routers support DDNS providers like No-IP or Dyn DNS. For this example, we’ll use No-IP, a popular free DDNS provider.
-
Create a DDNS Account with No-IP:
-
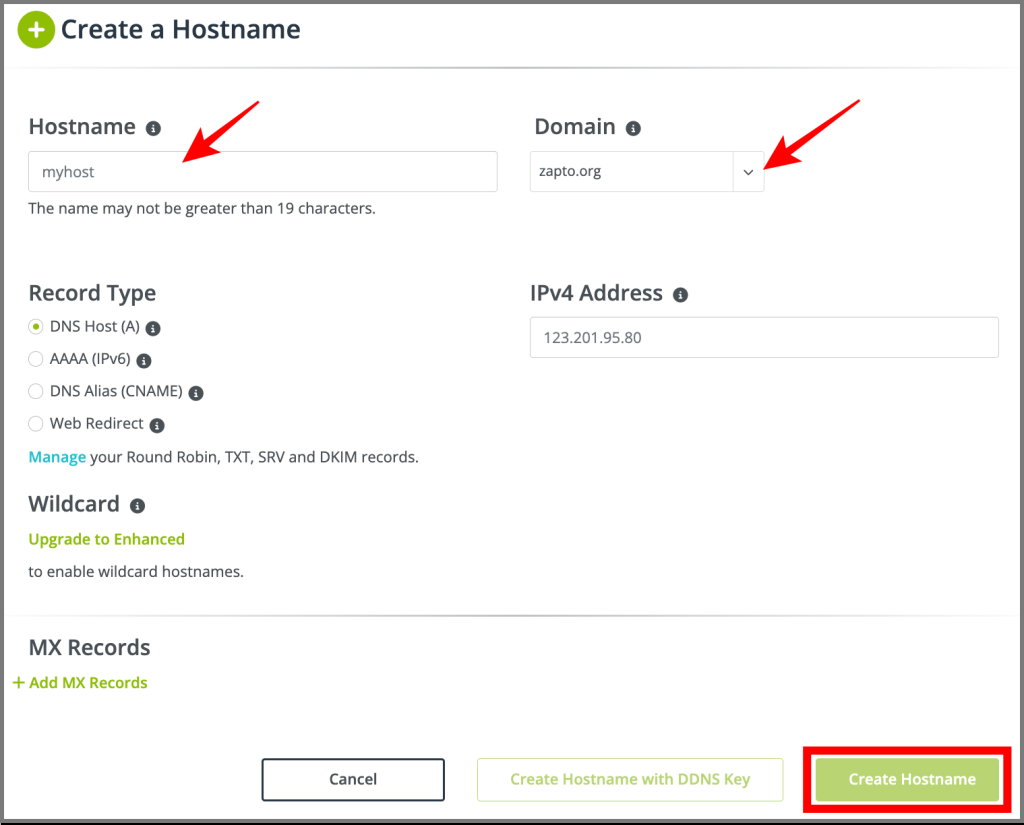
- Visit the No-IP website, create an account, and log in to access the dashboard.
- Go to Dynamic DNS > No-IP Hostnames and click Create Hostname.
- Enter a hostname of your choice (e.g., “myhome.ddns.net”) and choose a domain from the dropdown options. Once done, save it.

-
Link DDNS to Your Router:
- In your router’s DDNS settings, enter the hostname you created on No-IP.
- Input your No-IP username and password to authenticate the connection.
- Save the changes, and your dynamic domain will now route to your home IP address.
-
Access Your Router Remotely Using Your Domain: To remotely access your router, enter the DDNS hostname followed by your router’s remote management port number (e.g., “myhome.ddns.net:9090”).

Security Tips for Remote Access
- Strong Passwords: Always use complex passwords for both your router and your DDNS account to prevent brute-force attacks.
- Change Default Ports: Default ports (like 8080) are widely known and often targeted; selecting a unique port adds an extra layer of protection.
- Regularly Monitor Connected Devices: Use your router’s web interface to view connected devices periodically and ensure that no unauthorized users are connected.
Conclusion
Enabling remote access on your router is a practical solution for monitoring and managing your home network while away. By configuring remote management and setting up DDNS, you can gain secure access to your network from anywhere with internet connectivity. With these steps in place, you’ll have peace of mind knowing you can always check in on your network, troubleshoot issues, or access files as needed, without relying on additional software or keeping other devices turned on.
Frequently Asked Questions (FAQs)
1. Is remote access safe for home routers?
- Remote access can be safe if you follow security best practices, including using strong passwords, changing the default management port, and monitoring your DDNS account regularly.
2. Can I access my router remotely without DDNS?
- You can technically use your public IP address, but since this IP may change regularly, DDNS provides a more stable and user-friendly option.
3. What if my router doesn’t support DDNS?
- You can use a DDNS client on a home computer to update your IP address periodically, though this requires the computer to remain on.
4. Can I disable remote access when I don’t need it?
- Yes, most routers allow you to toggle the remote access feature on and off, which can be a good security practice if you don’t require continuous remote access.
5. Why does my public IP address change?
- Most ISPs assign dynamic IPs to home connections to conserve IP resources. This is common for residential users, while business users typically have static IPs.